Contents
Introduction
Opti Invisible Zip Products
Invisible Zips Insertion Techniques
Frequently Made Mistakes in Sewing Invisible Zips
Introduction
This technical bulletin is a comprehensive guide to invisible zips including best practice insertion techniques, product information, standards and recommendations, plus frequently made mistakes in sewing invisible zips.
Opti Invisible Zip Products
| Products | ||||
| S43 (#2) | S44 (#2) | S54 (#4) | S64 (#5) | |
| Chain width | 4mm | 4mm | 5mm | 6mm |
| Tape type | Polyester knitted tape | Polyester woven tape | Polyester woven tape | Polyester woven tape |
| Principali utilizzi |
|
|
||
| Suitable fabric weight | <100 gr/m2, light fabrics, knitted or woven, without lycra | <140 gr/m2, light fabrics, knitted or woven, without lycra | 140 – 220 gr/m2, knitted or woven fabrics, with or without lycra | >220 gr/m2, knitted or woven fabrics, with or without lycra |
| Standards | Certified to Öko-Tex Standard 100, Class 1. | |||
| Standard, Class A Ultra light (BSI 3084) or Class ½(ASTM) | Standard, Class B Light weight (BSI) or Class ½(ASTM) | Standard, Class B Light weight (BSI) and Class 3 (ASTM) | ||
| Sewing grooved foot | Article C4PAM | Article C4PAM | Article S5PAM | Article FOOT270 |
| Care Information | Invisible zips are not recommended for use in heavy washed denim and leather garments. | |||
|
|
|||
| Can be used in garments made of fabrics with lycra. | – To be preferred in garments made of fabrics with lycra – Can be used in bedding, avoiding sharp turns and corners |
|||
Invisible Zips Insertion Techniques
| Invisible Zips Insertion Techniques | |||
 |
 |
 |
 |
| 1) A concealed zip gives an effective opening approximately 2.5cm less than its length. Thus for a 20cm opening a 23cm zip is required. | 2) Do not iron. Heat or pressure can damage the teeth of the zip. | 3) The correct grooved foot for invisible zips must be selected. The nose and the channels are there to help keep the teeth vertical while stitching. | 4) The sewing foot should be centered properly by aligning the needle to the centre fin. |
 |
 |
 |
|
| 5) A balanced feed dog should be selected to obtain optimum appearance of the seam. This feed type will allow uniform pressure to be applied to the fabric and the zip, regardless of which side of the zip is sewn. | 6) Turn the zip with puller to the fabric and fully open it. Align the edge of the zip tape to the selvedge of the garment panel. | 7) Unfold the spiral teeth to be at right angles to the tape and lower the channel of sewing foot over the spiral as shown, with the nose of the foot above the top stop. | |
 |
 |
 |
 |
| 8) Once the grooved foot is positioned, commence sewing, back tack for approximately 5mm to secure the end of the zip. | 9) Sew along the length of the zip, repeating on both sides. Back tack for approximately 5mm. | 10) The correct stop position is 2mm before hitting slider. | 11) The incorrect stop position is when the sewing foot is hitting the slider. |
 |
 |
 |
 |
| 12) Use a half foot to close the seam below the zip. | 13) Stitch as near as possible to the zip insertion seam, overlapping by 5mm, back tack to secure | 14) Note that approximately 4 cm of the bottom of the zip will be unattached at this stage. The bottom tape extensions of the zip should be secured to the fabric on both sides. Otherwise seam failures are possible. | |
| Our technical advisers are always at hand to offer the help and support needed. | |||
Frequently Made Mistakes in Sewing Invisible Zips
| Frequently Made Mistakes in Sewing Invisible Zips | ||
| We strongly recommend to use dedicated feet for invisible zips which always deliver the correct result. | ||
| Stitching problem | 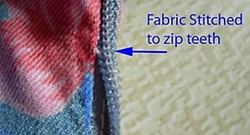 |
Using half sewing foot can lead to incorrect stitching and the fabric getting caught in the path of the slider, thus dislodging it. |
| Stitching problem | 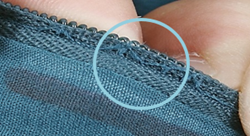 |
Care should be taken to not stitch through the zip’s teeth, to avoid slider jamming and damaging the tape. |
| Needle damage | 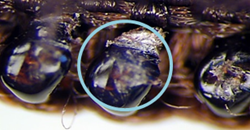 |
Not using proper grooved foot may lead to teeth damage by the needle. |
| Care should be taken at design stage when invisible zips cross side seams or go through the waistband | ||
| Materials in the path of the slider | 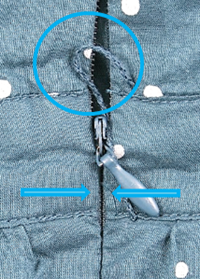 |
Stitching should allow room for slider to run with ease, especially where cross seams and panel seams are forming multi-layer fabric construction. |
| No loop cords or labels which may jam the slider. | ||
| Loose threads | 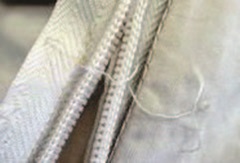 |
Care should be taken to cut away all loose threads to prevent the slider from jam and failure. |
| Loose tape ends | 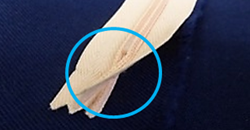 |
Do not leave the zip tape ends loose. Fix them to the seam allowance. |


