Contents
Needle Production Process
This gives a basic understanding of some of the processes.
There are over 30 stages to transform needle wire into a finished needle and these include just a few of the processes in the illustration below.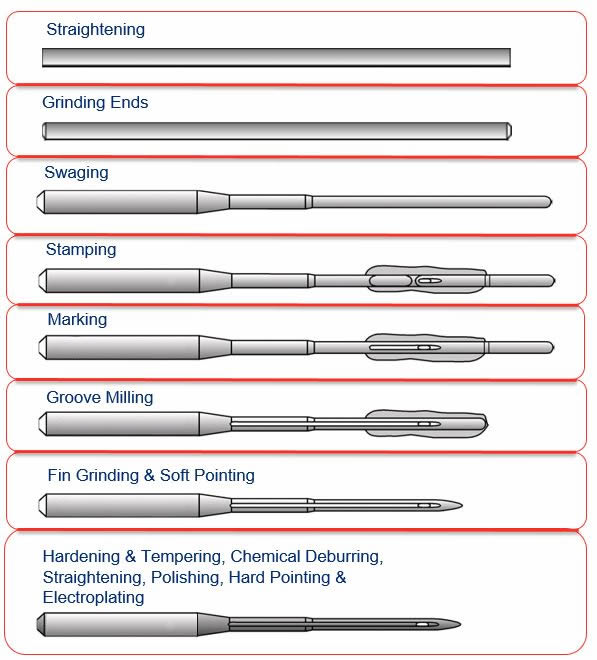
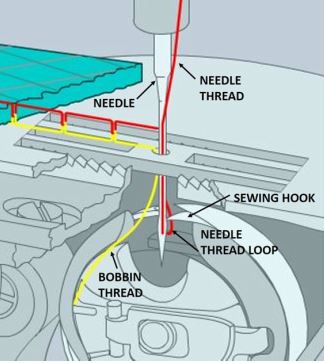
The Basic Functions of a Needle
- To make a hole in the fabric or material
- To carry the needle thread through the material or fabric
- To help form a needle thread loop which can be picked up by the hook or looper
The illustration on the right shows this process in a lockstitch machine.
Needle Parts / Identification – Blades
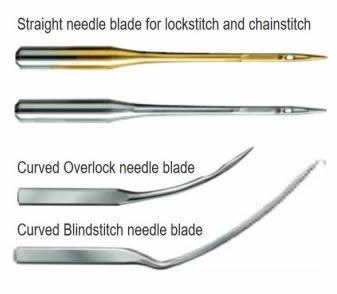
- There are two basic types of sewing machine needle blades and these are either straight or curved.
- The straight needle blades are the most common and used in a wide range of sewing machines (Lockstitch and Chainstitch).
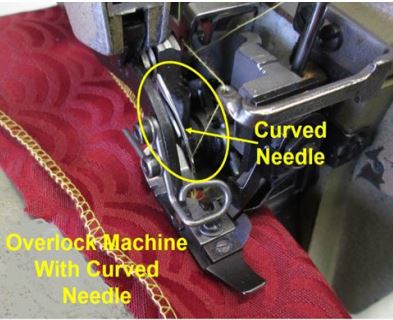
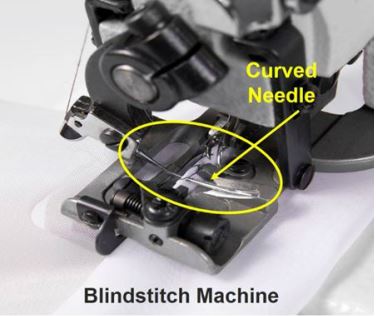
- Curved needle blades are mostly used on blind stitching machines. (Hemming trousers or skirts) However, some overedge machines also use needles with a curved blade.
Curved Needles in a Blindstitch and Overedge machine
A sewing machine needle is identified with three parameters and they are:
Needle Parts / Identification
A needle has various parts to execute different functions during the sewing operation.
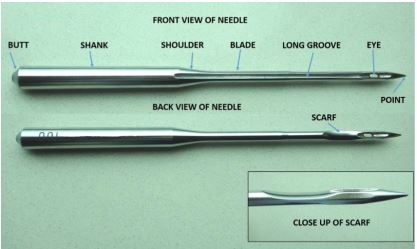
To find out all the different needle parts please read our Needles 101 technical bulletin. Below we have gone into more detail on the shank and thescarf part of the needle:
Shank
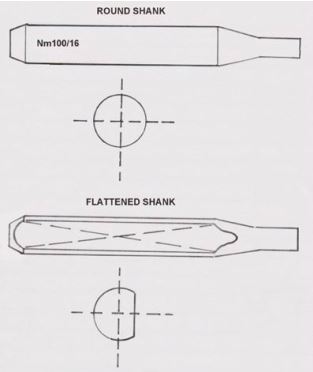
- Shank: The Needle size and manufacturers trade mark are also stamped into the shank and as a rule the size is denoted as NM which is the metric sizing
- There are different shank types available for different machines, the two most common are the round and flattened shank
- The round shank is the most common but when inserted into the needle bar it has to be aligned by hand to ensure the scarf is in alignment with the hook or looper
- The flattened shank lines up with the flat section inside the needle bar and ensures there is alwayscorrect alignment with the sewing implement (hook or looper)
Scarf
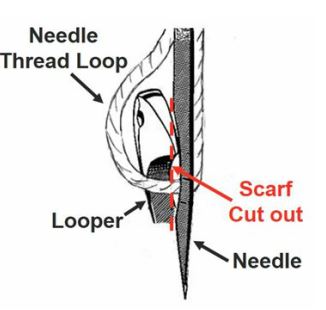
- The scarf is the “trough” shaped cut out in the blade of the needle
- This permits the looper (chainstitch) or sewing hook (lockstitch) to be set closer to the needle increasing the potential for good pick up the needle thread loop.
Needle Finishes
These are some of the most common finishes or needle coatings as outlined below. Needle choice is dependent on the stitching conditions and care needs to be taken when choosing a particular finish. The different coatings result in a different hardness to the needle making the needle stronger or more resilient to coated fabrics.
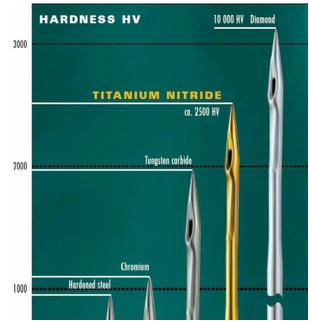
- Chrome: This is the most common coating used and protects the needle from corrosion.
A hard chrome coating gives the sewing machine needle a high abrasion resistance. These needles can be used in all types of sewing machines in a wide range of end uses - Hardened steel / Nickel: These needles can prevent rusting and protect the needle from friction during sewing.
However, they deteriorate when used in high friction areas (thick dense fabric) and at high machine speeds. For this reason they are best suited only for basic stitching operations - Titanium Nitrate: Is used to give a hard and smooth surface to the needle. These needles often have a gold colour finish.
Titanium coating resists adhesives, improves needle wear and penetration of coarse and densely woven fabrics.
It can also improve a sewing needles’ expected lifetime substantially compared to the other coatings. - Others: There are various other needles finishes available with non stick / anti adhesion coating designed to reduce adhesion of melted synthetic fibres to the needle. The needle remains cleaner longer and skipped stitches and thread breakage are minimised
- Ceramic coating: This is for very specialised areas. It reduces heat by 20-25% and can prevent static electricity before it occurs
The different finishes will effect the performance of the needle with regards to heat resistance, needle hardness and wear and tear. So care needs to be taken when selecting the needle finish in that it is fit for purpose.

Needle Systems
Needles are manufactured for different sewing machines using a “needle system” coding. This is based on the needle specifications needed to match the sewing machine specifications / stitch forming implement. So each system code is based on that needles specifications; length of blade, shank thickness, type of eye, size of eye etc.
The needle system can be numerical or alpha numerical and these designations are often created by the sewing machine manufacturer in conjunction with the needle manufacturer.
Different sewing machine companies may use different system numbers for the same needle! (135×17 and DPX17 are the same needle but used by two different sewing machine manufacturers).
Do you have the correct needle system for a sewing machine?
It is critical to establish that you are using the correct needle system for the correct sewing machine.
Details of the correct system will be found In the sewing machine manual / instruction book normally under “specifications”. A printed sticker may also be attached to the sewing machine detailing the system number.
The needle system doesn’t tell you the needle size (blade thickness) or type of point, this information is on the needle packet.
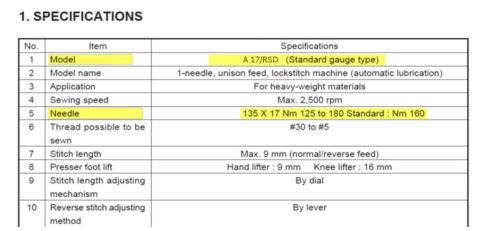
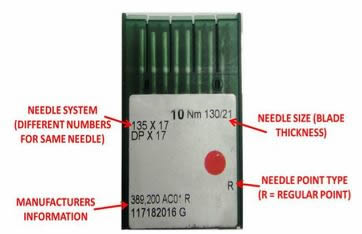
The needle system can also be found on needle packets.
Neverput a needle in a machine that someone has just handed you (operator / supervisor etc.) as you can’t be sure it’s the correct needle.
Make sure you have taken it directly from the packet, as this is the only way you can be certain of using the correct needle.
A needle that has not been taken straight from the packet could be the wrong needle system and damage the machine.
Or worse it may be too long or too short and make you believe that the machine settings are wrong.
Where can I find the needle size / thickness?
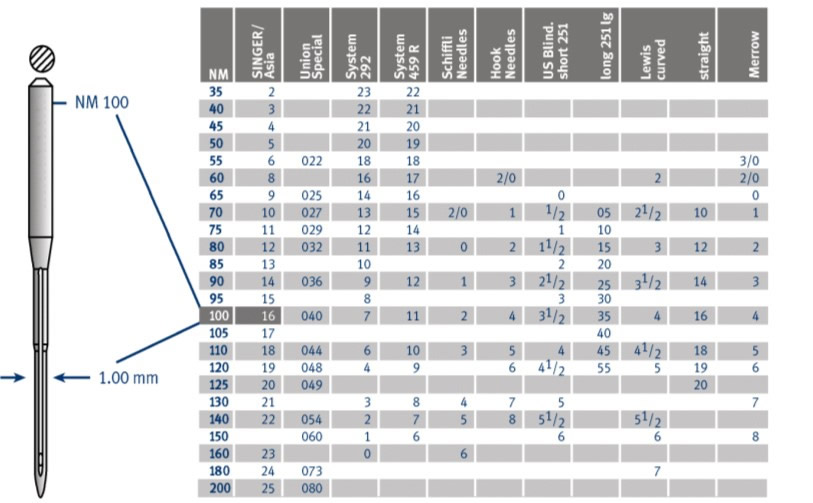
The size of a needle is based on the needle blade width, which is measured in millimeters and represents the needle size. The needle size / thickness is also stamped on the needle shank.
It gives an Nm (metric) size and may include the Singer needle size, for example 100/16. (Nm100 – Singer 16).
The Nm coding is based on a metric sizing and is the most common used.
- Example – An Nm 100 needle size represents a needle blade width of 1mm
- Example – An Nm 75 needle size represents a needle blade width of 0.75mm
Needle, Thread and Material Relationship
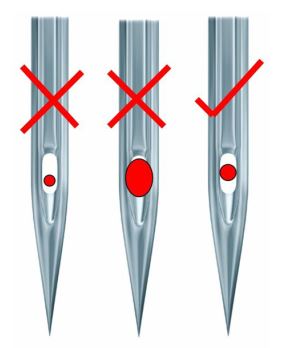
Selection of correct needle size is critical to the success of a quality sewn seam.
Some important factors to consider are:
- The material type and construction of garment
- The material thickness to be sewn
- The machine type used
The sewing thread selected for the garment should move freely through the eye of the selected needle to ensure smooth passage during sewing.
The general guideline is that the thread should fill 70% of the eye of the needle.
How to test needle to thread size
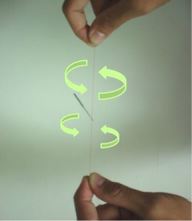
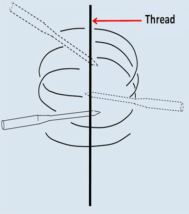
To confirm that the correct size thread needle combination is used the following test can be carried out:
- Take half a metre of the thread being used on the machine and thread it through the eye of a loose needle
- Hold the thread vertically with the needle at the top
- If the needle is too big, it will drop to the bottom of the thread
- If the needle is too small, it will stick at the top of the thread
- If the needle is the right size, it will slowly spiral to the bottom of the thread
Needle size to thread size & fabric weight “guidelines”
This table is only a guideline that can help you select the correct needle size to thread size in relation to the weight of material being sewn.
Choices will always have to be made in relation to actual seam types, material thickness for the seam, seam end use and various other stitching conditions.
Guide to material weight:
- L = Light
- M = Medium
- H = Heavy
Correct needle to thread size in relation to the weight of material being sewn
| Synthetic Ticket No. | Material Weight | Diameter (mm) | Singer | Metric (nm) |
| 320, 260 | L | 0.55 | 7 | 55 |
| M | 0.65 | 9 | 65 | |
| H | 0.70 | 10 | 70 | |
| 200, 180, 160, 150 | L | 0.55 | 9 | 65 |
| M | 0.70 | 10 | 70 | |
| H | 0.75 | 11 | 75 | |
| 140,120, 100, 80 | L | 0.75 | 11 | 75 |
| M | 0.80 | 12 | 80 | |
| H | 0.90 | 14 | 90 | |
| 75, 70, 60 | L | 0.90 | 14 | 90 |
| M | 1.00 | 16 | 100 | |
| H | 1.10 | 18 | 100 | |
| 50, 40 | L | 1.00 | 16 | 100 |
| M | 1.10 | 18 | 110 | |
| H | 1.20 | 19 | 120 | |
| 36, 30 | L | 1.10 | 18 | 110 |
| M | 1.20 | 19 | 120 | |
| H | 1.30 | 21 | 130 | |
| 25, 20 | L | 1.20 | 19 | 120 |
| M | 1.30 | 21 | 130 | |
| H | 1.40 | 22 | 140 | |
| 18, 16, 13, 12 | L | 1.60 | 23 | 160 |
| M | 1.80 | 24 | 180 | |
| H | 2.00 | 25 | 200 | |
| 10, 8, 7, 6 | L | 1.30 | 21 | 130 |
| M | 1.40 | 22 | 140 | |
| H | 1.60 | 23 | 160 |


